1. Verify the complete message displayed in the yellow bar on the LCD.
– If the message displayed is “Paper Jam [Front, Rear]”, go to STEP
– If the message displayed is “Paper Jam [Rear]”, refer to solution: “How
do I clear the message ‘Paper Jam [Rear]’ from the display?”
– If the message displayed is “Paper Jam [Front]”, refer to solution: “How
do I clear the message ‘Paper Jam [Front]’ from the display?”
– If a different message is displayed, search for the specific message and follow
the solution related to that message.
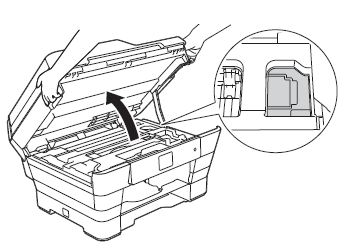
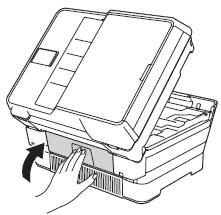
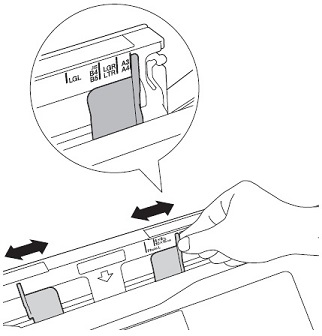
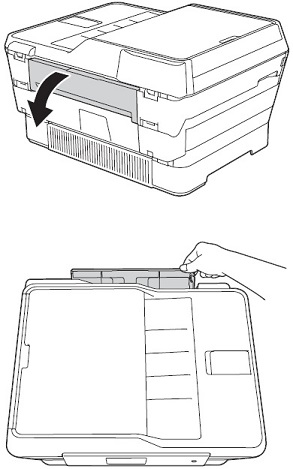
2. Lift the Scanner Cover (1) to the open position using the finger hold handles located on the right and left side of the cover.
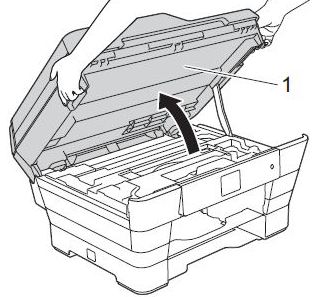
a. Do you see the scanner cover support arm, located on the right side of the machine? See image below.
– If yes,continue to STEP
b.
– If no, then you have opened the document cover instead of the scanner cover. When
the document cover is open you will not see the scanner cover support arm.
Close the document cover and go back to STEP
2 to open the scanner cover.
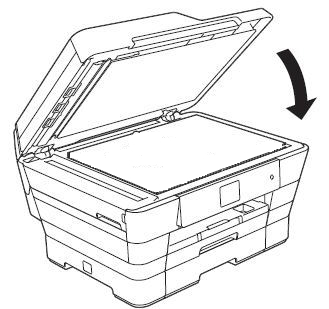
b. Lift the scanner cover to release the lock. Gently push the green scanner cover support down and close the scanner cover using both hands.

– If the LCD continues to display the message “Paper Jam [Front Rear]”, go to STEP
3.
– If the LCD returns to the standby mode and the machine did NOT print a document go to STEP
14.
– If the machine prints a document and the LCD returns to the standby mode, were you printing from the Manual Feed Slot?
(located in the back of the machine).
– If yes, go to STEP
15.
– If no, the issue is resolved. Opening and closing the scanner cover reset the
machine and cleared the message.
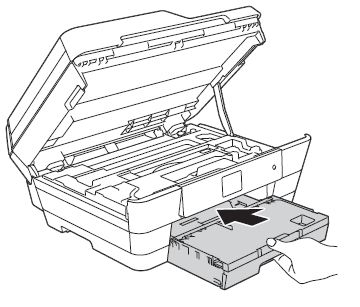
3. Remove the paper tray from the
machine.
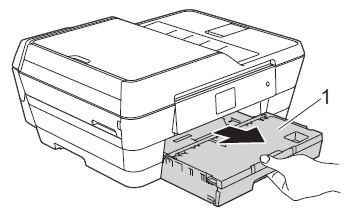
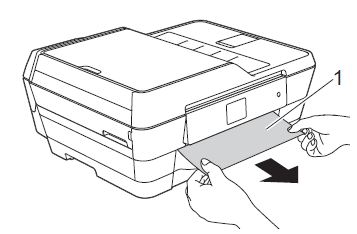
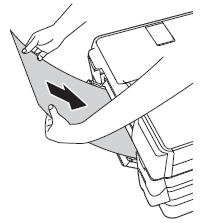
4. Look for and remove any jammed paper (1).
5. Look inside the machine where the paper tray was installed. Lift up the black
plastic flap located in the front tray cavity of the machine. Look inside
the opening of the machine, in the area above the silver metal and remove
any pieces of paper.
6. Make sure you look carefully inside the machine for any pieces of paper.
7. Check inside the machine.
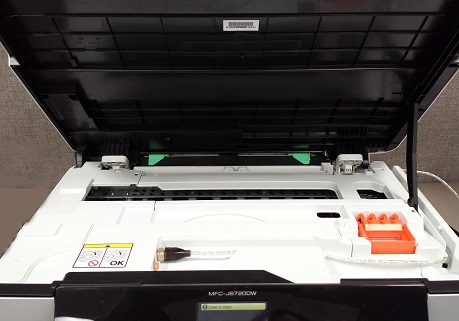
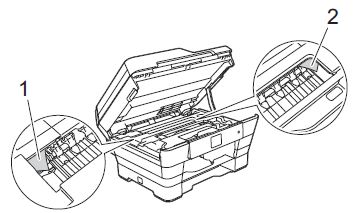
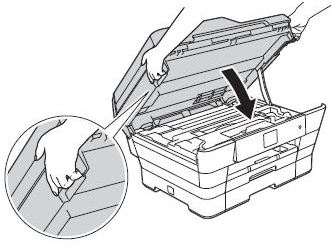
a. Lift the Scanner Cover (1) to the open position using the finger hold handles
located on the right and left side of the cover.

b. Pull any jammed paper out of the machine.

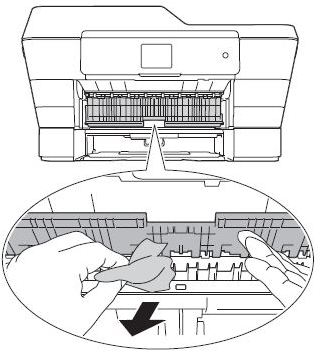
c. Carefully check the left (2) and right (3) hand corners and the center inside the
machine and remove any paper scraps that may be jammed.
NOTE: If
the print head is at the right corner as shown below, hold down the red X for
at least 5 seconds until the print head moves to the middle so the right
hand corner can be checked.
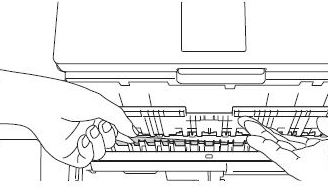
d. Use your hand to move the print head left or right to make sure there are no
paper scraps stuck under the print head.
8. Turn the machine around so you can see back of the machine. Open the Jam Clear Cover
on the back of the machine.
9. Open the green inside cover (1).
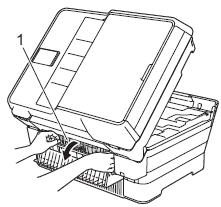
10. Look for and remove any jammed paper.
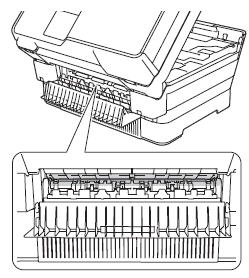
11. Close the Jam Clear Cover. Make sure it is closed securely on both sides.
12. After looking for debris, reinstall the paper tray by slowly pushing the tray all
the way in. You should hear a slight snap or click once the tray is seated
properly.
SAY TO CUSTOMER: It
is very important the paper tray be reinstalled into the machine before you
continue to troubleshoot this issue.
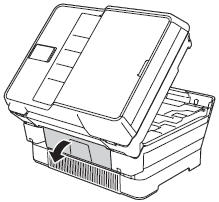
13. Gently close the scanner cover using the finger holds on each side while pushing
down on the cover.
– If the LCD returns to the standby mode and does not display an error message,
continue to STEP
14 to test the machine.
– If the message “Paper Jam [Front, Rear]”continues to be displayed,
disconnect the machine from the power outlet for 5 seconds and then plug it
back in. Repeat STEPS
3 through 13 to verify that you did not miss any jammed paper or scraps of paper.
– If the message “Paper Jam [Front, Rear]” continues to be displayed after repeating STEPS
3 through 13, refer to WARRANTY
AND SERVICE OPTIONS below.
– If any other message is displayed, refer to the solution for the message
displayed.
14. Print a test page:
a. Were you printing from the Manual Feed Slot?
– If YES, continue to STEP 14b.
– If NO, go to STEP
14i.
b. Open the Manual Feed Slot cover.

c. Slide the Manual Feed Slot paper guides to match the width of the paper you are
going to use.
NOTE: When
you slide the paper guides, confirm that they are in the correct positions:
– The paper mark in portrait orientation (1) is on the right side of the Manual
Feed Slot.
– The paper mark in landscape orientation (2) is on the left side of the Manual
Feed Slot.
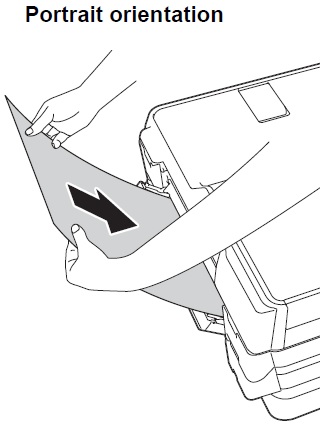
d. Place only one sheet of paper into the Manual Feed Slot.
– Make sure the side to be printed is face
up.
– If you are using Ledger, A3,
Legal, A5, A6, Photo, Photo L, Photo 2L paper; envelopes; or index cards,
insert the sheet in portrait
orientation. See
image below.
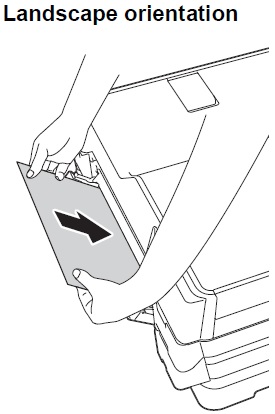
– If you are using Letter,
Executive, or A4 paper, insert the sheet in landscape
orientation. See image
below.
IMPORTANT:
– Do not put more than one sheet of paper in the Manual Feed Slot at any one time. Doing this may cause a paper jam. Even if you are printing multiple pages, do not
feed the next sheet of paper until the Touchscreen instructs you to do so.

– Do not put paper in the Manual Feed Slot when you are printing from the paper tray.
Doing this may cause a paper jam.
e. Using both hands, gently adjust the Manual Feed Slot paper guides to fit the
paper.
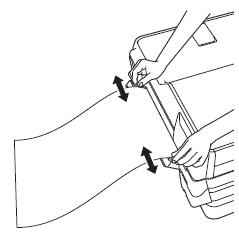
NOTE:
– Do not press the paper guides too tightly against the paper. Doing this may cause the paper to fold.
– Place the paper in the center of the Manual Feed Slot between the paper guides.
If the paper is not centered, pull it out and insert it again at the center
position.
f. Using both hands, feed the paper into the Manual Feed Slot until the front edge
touches the paper feed roller.
– Let go of the paper when you hear the machine pull it in a short distance. The LCD will should briefly (3 seconds) display the message “Manual Feed Slot ready” and then return to the standby mode.
NOTE:
– When loading an envelope or sheet of thick paper, push the envelope into the
Manual Feed Slot until you feel the machine grab the envelope or paper.
– When you are feeding Legal, Ledger, or A3 size paper into the Manual Feed Slot,
the machine holds the printed page after printing so that the page does not
fall. Once printing is complete, pull out the printed page and press OK.
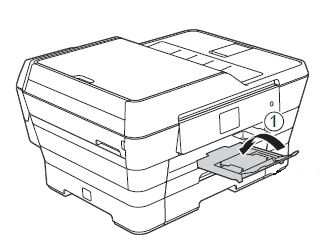
g. If you are using paper that is longer than Letter size or envelopes with the
flap on the short edge, close the paper support flap.
h. Print the same document that you were trying to print when the jam occurred and
then click here to continue.
i. Press the 4 Color Column  on the touch screen.
j. Press Test Print.
k. Press Print Quality.
l. Press OK. A Print Quality Check Sheet will
print.
– If the document prints and the message “Paper
Jam Front Rear” is NOT displayed,
the issue is resolved. Press the Home to
return to the standby mode.
– If the message “Paper Jam Front,
Rear” continues to appear on
the display and you have not followed
STEPS 3 through 14, go back to STEP
3.
– If the message “Paper Jam Front,
Rear” continues to appear on
the display and you have followed STEPS
3 through 14, continue to STEP
15.
– If any other error message appears, search for the specific error and follow
the solution related to that error message.
15. If you removed jammed paper from under the scanner unit or the
back of the machine when performing the previous troubleshooting steps (STEPS
1 through 14), go to STEP
17.
– If you did NOT find jammed paper under the scanner unit or the back of the machine continue to STEP
16.
16. Confirm the paper being used in the paper tray meets the machine’s media
requirements (Check the paper packaging if necessary):
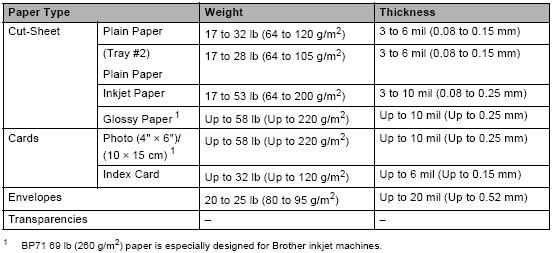
NOTE: Do not use any of the following types of paper:
– Damaged, curled, wrinkled or irregularly shaped paper.
– Extremely shiny or highly textured paper.
– Paper that cannot be arranged uniformly when stacked.
– If the paper meets the machine paper requirements, refer to WARRANTY
AND SERVICE OPTIONS below.
– If the paper does not meet the machine paper requirements, replace it with
paper that does meet the requirements. After replacing the paper, if the
error message does not clear, go to STEP
3 to repeat the
troubleshooting steps.
17. A small piece of paper may still be stuck inside the machine. Feeding a sheet
of letter size glossy paper
through the machine can assist in removing a small piece of paper stuck
inside.
18. Clear the message “Paper Jam [Front Rear]”
NOTE: Images
for the steps listed below are included in the previous steps.
a. Pull the paper tray completely out of the machine and remove any jammed paper
from inside the machine.
b. Check inside the machine:
i. Lift the Scanner Cover to the open position using the finger hold handles located
on the right and left side of the cover.
ii. Carefully check the left and right hand corners and the center inside the machine and
remove any paper scraps that may be jammed.
iii. Use your hand to move the print head to the left and right, checking carefully
for any paper scraps stuck under the print head.
c. Open the Jam Clear Cover on the back of the machine.
d. Open
the green inside cover.
e. Look for and remove any jammed paper.
f. Close the Jam Clear Cover. Make sure it is closed securely on both sides.
g. Reinstall
the paper tray into the machine.
h. Lift the flat bed scanner cover to release the lock, gently push the green
scanner cover support down to close the scanner cover.
– If you have completed this step 1 or 2 times, continue to STEP
19.
– If you repeated this Step three times and removed small
pieces of paper (paper scraps) from the machine, continue to STEP
25.
– If you repeated this Step three times and you did
not find any small pieces of
paper (paper scraps) in the machine, continue to WARRANTY
AND SERVICE OPTIONS below.
19. Open the Manual Feed Slot cover.
20. Slide the Manual Feed Slot paper guides to match the width of the Letter size
paper.
21. Using both hands, gently adjust the Manual Feed Slot paper guides to fit the
paper.

22. Using both hands, put one sheet of letter size Glossy paper or a sheet of
cardstock into the Manual Feed Slot until the front edge touches the paper
feed roller in Landscape orientation.
– If you do not have letter size
glossy paper or cardstock, you can stack 2 sheets of letter size copy
paper together to use in place of the card stock or glossy photo paper:
–
Take two blank sheets of letter size paper, put them together and then fold them in
half so the two long sides meet (Left side and right side of paper. Do
not fold Top to Bottom).
23. Unplug the machine’s power cord from the power outlet for 2 seconds an plug the
power cord back into the power outlet to cycle the power.
24. While the machine is powering up, apply some force onto the edge of the paper in
the manual feed slot to ensure the paper feeds through the machine.
– If the paper feeds through without jamming continue to STEP
25.
– If the paper jams go back to STEP
18.
25. Print a PQCS to test:
- Press the 4 Color Column
 on
on
the touch screen. - Press Test Print
- Press Print Quality
- Press OK. A Print
Quality Check Sheet will
print.
– If the message “Paper Jam [Front, Rear]” is
displayed refer to WARRANTY
AND SERVICE OPTIONS below.
– If the PQCS prints, the issue is resolved. Press the Home to
return to the standby mode.