HP LaserJet Printers – ‘Install Black Cartridge’ Displays
This document is for HP LaserJet printers.
When trying to print, an Install Black Cartridge error message displays on the printer control panel or computer, or the attention light blinks on the printer.
This error message indicates that a toner cartridge is not installed, is not genuine, or an obstruction is preventing the toner cartridge from being recognized.
Install a toner cartridge to prevent this message from displaying. If a toner cartridge is installed and the message displays, use the following steps to fix the issue.
Step 1: Use genuine HP toner cartridges
HP recommends that you use genuine HP ink or toner supplies. HP cannot guarantee the quality or reliability of non-HP or refilled cartridges. If you do not use genuine HP cartridges, the steps in this document might not resolve the issue.
Visit HP SureSupply to check ink or toner cartridge compatibility, or purchase replacement cartridges.
-
Go to HP SureSupply.
-
Scroll to the bottom of the page, and then make sure the country/region location is correct.
-
Follow the on-screen instructions to order new cartridges or check cartridge compatibility with your printer.
You can also purchase genuine HP cartridges from other retailers.
If using genuine HP toner supplies did not resolve the issue, continue to the next step.
Step 2: Check for packing materials and paper
Check the toner cartridge and printer for any packing materials and paper that might be causing the error message.
NOTE:
The following images might show a different printer than your model, but the steps are the same.
-
Turn off the printer.
-
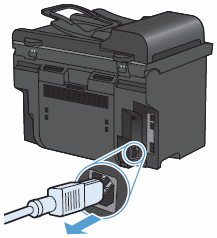
Disconnect the power cord from the printer.Figure : Disconnecting the power cord
-
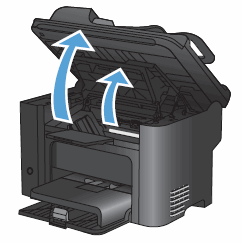
Open the toner cartridge door.Figure : Opening the toner cartridge door
-
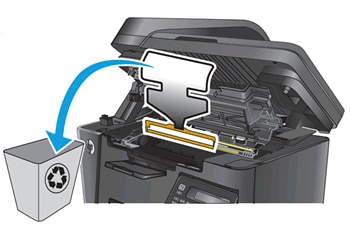
Look for and remove any packing material such as cardboard, tape, or paper debris.Figure : Example of removing packing material
-
Remove the toner cartridge.Figure : Removing toner cartridge
-
Look for and remove any additional packing material or paper debris inside the toner cartridge area.
-
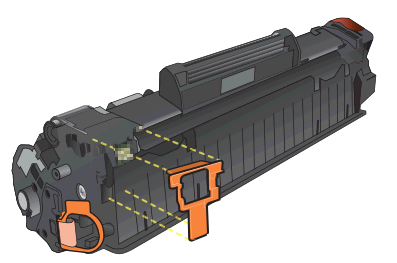
Check for and remove the orange tab on the toner cartridge.Figure : Removing the orange tab
-
Check for and remove the protective sealing tape on the toner cartridge.To remove the protective sealing tape, pull the tab away from the toner cartridge, and then discard.
CAUTION:
If toner gets on your clothing, wipe it off with a dry cloth and wash the clothing in cold water. Hot water sets toner into the fabric.Figure : Removing the protective sealing tape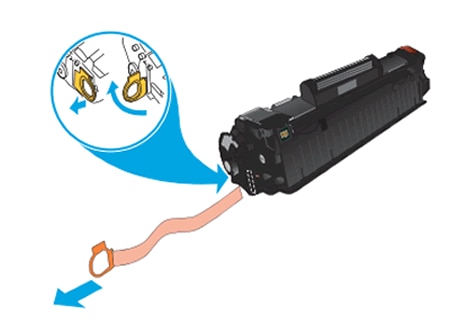
-
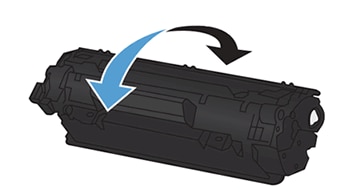
Gently rock the toner cartridge from front to back to make sure the toner is distributed evenly.Figure : Rocking the toner cartridge
-
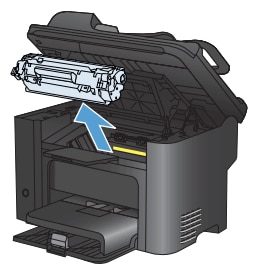
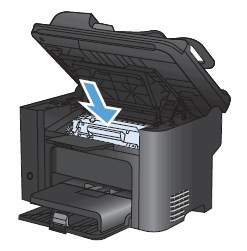
Insert the toner cartridge into the printer, and then close the toner cartridge door.Figure : Inserting the toner cartridge
-
Reconnect the power cord, and then turn on the printer.
If checking for and removing packing materials and paper did not resolve the issue, continue to the next step.
Step 3: Check the printer for additional jammed paper
Jammed paper or debris might cause the error message. Checking other areas in the printer where jammed paper occurs might resolve the error message. For detailed instructions on clearing a paper jam from your printer, go to HP Customer Support. Type your printer model, and then search for “paper jam” under the Troubleshooting tab.
If you did not find a paper jam or clearing any excess paper did not resolve the issue, continue to the next step.
Step 4: Clean the electric contacts on the toner cartridge
The toner cartridge might have a faulty connection to the printer. Use a lint-free cloth to clean the toner cartridge contact (E-label).
-
Open the toner cartridge access door.
-
Remove the toner cartridge from its slot.
-
Use a lint-free cloth to wipe the toner cartridge contact (E-label) on the top left of the toner cartridge.
NOTE:
Coffee filters work well.Figure : E-label on a toner cartridge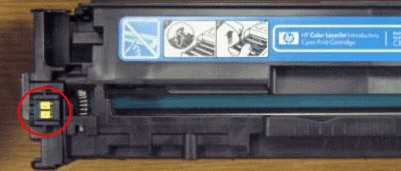
-
Insert the toner cartridge into its slot, and then close the toner cartridge access door.
If cleaning the E-label did not resolve the issue, continue to the next step.
Step 5: Reset the printer
Sometimes an error message persists even though there is no packing material or jammed paper inside the printer. Resetting the printer might resolve the error.
-
Turn the printer on, if it is not already on.
-
Wait until the printer is idle and silent before you continue.
-
With the printer turned on, disconnect the power cord from the rear of the printer.
-
Unplug the power cord from the wall outlet.
-
Wait at least 60 seconds.
-
Plug the power cord back into the wall outlet.
NOTE:
HP recommends connecting the printer power cord directly to the wall outlet. -
Reconnect the power cord to the rear of the printer.
-
Turn on the printer, if it does not automatically turn on.The printer might go through a warm-up period. The printer lights might flash, and the carriage might move.
-
Wait until the warm-up period finishes and your printer is idle and silent before you proceed.
If resetting the printer did not resolve the issue, continue to the next step.
Step 6: Replace the toner cartridge
If the previous steps did not resolve the issue, replace the toner cartridge with a genuine HP toner cartridge.
If replacing the toner cartridge did not resolve the issue, continue to the next step.
Step 7: Service the printer
If the error message continues and you have tried all the other steps in this document, service the printer.
Service or replace your HP product if you completed all preceding steps.
To see if your product is still under warranty, go to the warranty check website http://www.support.hp.com/checkwarranty. Contact HP Support to schedule a repair or replacement. If you are in Asia Pacific, Contact HP Support to find a local service center in your area.
Repair fees might apply for out-of-warranty products.